第3章 Nginx进阶
第x章 Nginx模块介绍
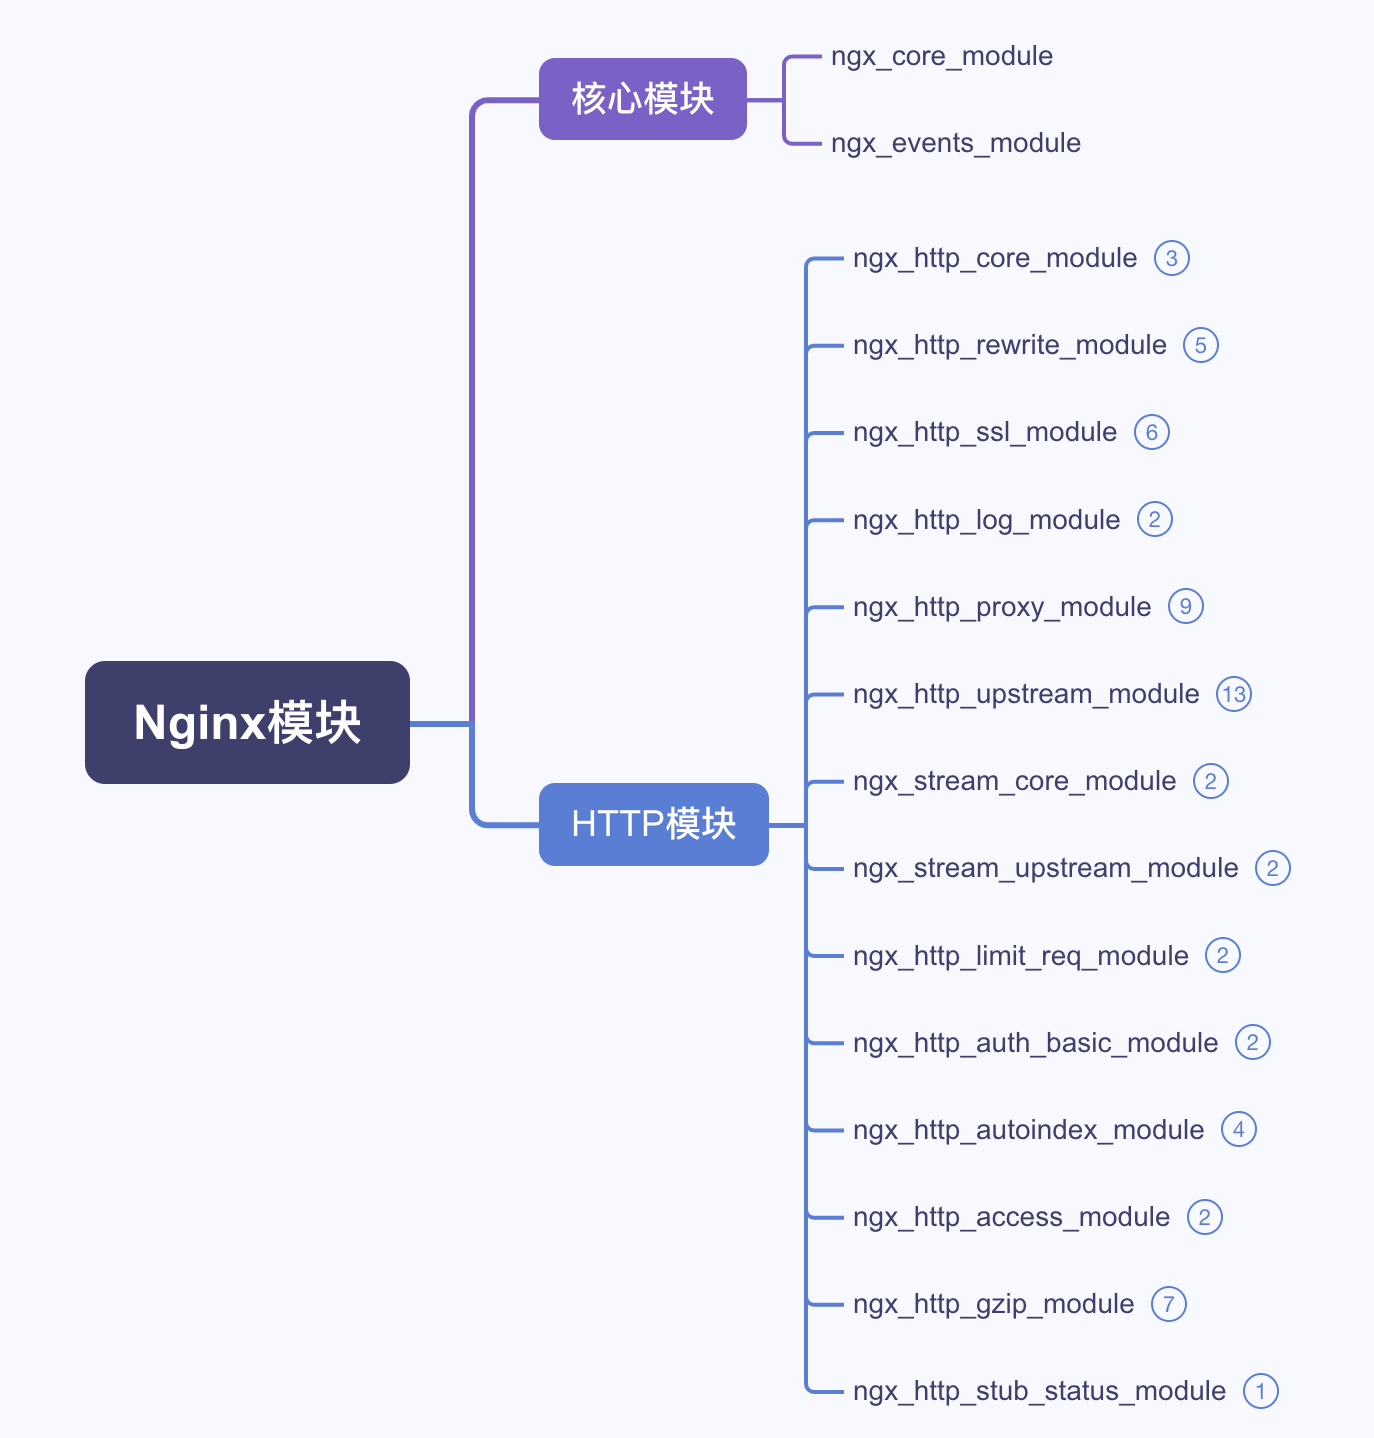
Nginx 是一个高性能的 HTTP 服务器和反向代理服务器,它采用模块化架构,这使得它具有高度的可扩展性和灵活性。

Nginx 的模块可以分为核心模块、标准 HTTP 模块和第三方模块。

以下是一些重要的 Nginx 模块及其功能简介:
1.核心模块
**ngx_core_module**:提供了 Nginx 的核心配置指令,如 **worker_processes**、**error_log** 等。

**ngx_events_module**:负责处理事件驱动机制,包括设置连接数、事件模型等指令,如 **worker_connections**。
2.HTTP 模块
**ngx_http_core_module**:Nginx 的核心 HTTP 模块,提供了基本的 HTTP 请求处理功能,包括 **server**、**location**、**if** 等指令。

**ngx_http_rewrite_module**:用于重写和重定向 URI,指令包括 **rewrite**、**return** 和 **set**。

**ngx_http_access_module**:用于基于 IP 地址限制访问权限,指令包括 **allow** 和 **deny**。

**ngx_http_auth_basic_module**:提供 HTTP 基本认证功能,指令包括 **auth_basic** 和 **auth_basic_user_file**。

**ngx_http_proxy_module**:实现反向代理功能,指令包括 **proxy_pass**、**proxy_set_header** 等。

**ngx_http_fastcgi_module**:用于与 FastCGI 服务器通信,指令包括 **fastcgi_pass**、**fastcgi_param** 等。

**ngx_http_gzip_module**:提供 Gzip 压缩功能,指令包括 **gzip**、**gzip_types** 等。

**ngx_http_log_module**:用于配置日志记录,指令包括 **access_log** 和 **log_format**。

**ngx_http_ssl_module**:用于配置 SSL/TLS,指令包括 **ssl_certificate**、**ssl_certificate_key** 等。

**ngx_http_autoindex_module:**用于自动创建目录列表页面,提供简单下载页面功能。指令包括 autoindex on/off

**ngx_http_stub_status_module:**提供了简单的服务器状态监控页面,包含连接数、接受和处理的请求数等基本信息

**ngx_http_limit_req_module:**用于限制客户端的请求速率,可以有效防止恶意用户进行DDoS攻击或者暴力破解
3.第三方模块
**ngx_http_lua_module**:允许使用 Lua 脚本编写 Nginx 配置。
4.思维导图梳理
https://www.processon.com/view/link/664f2bd46daf3a586ac6f9c1?cid=664f0ccc1f7bb3176577311
第x章 Nginx核心模块
1.Nginx核心模块介绍
[https://nginx.org/en/docs/ngx_core_module.html](https://nginx.org/en/docs/ngx_core_module.html)
2.Nginx核心模块关键指令
Syntax:	user user [group];
Default:
user nobody nobody;
Context:	main
---------------------------------------------
Syntax:	worker_connections number;
Default:
worker_connections 512;
Context:	events
---------------------------------------------
Syntax:	pid file;
Default:
pid logs/nginx.pid;
Context:	main
---------------------------------------------
Syntax:	worker_cpu_affinity cpumask ...;
worker_cpu_affinity auto [cpumask];
Default:	—
Context:	main
---------------------------------------------
Syntax:	events { ... }
Default:	—
Context:	main
---------------------------------------------
Syntax:	include file | mask;
Default:	—
Context:	any
3.Nginx核心模块默认配置
user  nginx;
worker_processes  auto;

error_log  /var/log/nginx/error.log notice;
pid        /var/run/nginx.pid;

events {
    worker_connections  1024;
}
第x章 HTTP核心模块
1.模块介绍
[https://nginx.org/en/docs/http/ngx_http_core_module.html](https://nginx.org/en/docs/http/ngx_http_core_module.html)
2.重要指令
Syntax:	http { ... }
Default:	—
Context:	main
---------------------------------------------
Syntax:	 listen address[:port] [default_server] [ssl]
                 listen port [default_server] [ssl]
                 listen unix:path [default_server] [ssl]
Default:	listen *:80 | *:8000;
Context:	server
---------------------------------------------
Syntax:	server_name name ...;
Default:
server_name "";
Context:	server
---------------------------------------------
Syntax:	location [ = | ~ | ~* | ^~ ] uri { ... }
location @name { ... }
Default:	—
Context:	server, location
---------------------------------------------
Syntax:	root path;
Default:
root html;
Context:	http, server, location, if in location
3.listen指令
监听IP+端口
listen 127.0.0.1:8000;
listen 127.0.0.1;
listen 8000;
listen *:8000;
listen localhost:8000;
监听sock
listen unix:/var/run/nginx.sock;
4.server_name指令
匹配多个域名
server {
    server_name example.com www.example.com;
}
通配符匹配域名
server {
    server_name example.com *.example.com www.example.*;
}
合并域名
server {
    server_name .example.com;
}
正则表达式域名
server {
    server_name www.example.com ~^www\d+\.example\.com$;
}
禁止直接使用IP地址访问
server {
    listen 80 default_server;
    server_name _;
    return 444;
}
5.location指令
location指令介绍
Nginx 的 **location** 指令属于 **ngx_http_core_module** 模块。这个模块是 Nginx 的核心模块之一。
location语法介绍
http://nginx.org/en/docs/http/ngx_http_core_module.html#location
Syntax:	location [ = | ~ | ~* | ^~ ] uri { ... }
location @name { ... }
Default:	—
Context:	server, location
location举例
URL与URI
http://nginx.org   /en/docs/http/ngx_http_core_module.html#location
URL                      URI

http://www.luffycity.com  /python/index.html
server_name		         location
鱼塘					 钓鱼

server_name 路飞鱼塘;
location /草鱼 {
   切;
   蒸;
   红烧;
}

http://老张鱼塘/草鱼.html
http://路飞鱼塘/鲤鱼.html
http://路飞鱼塘/草鱼.html
location语法优先级
| 匹配符 | 匹配规则                     | 优先级 |
| ------ | ---------------------------| ------ |
| =      | 精确匹配                    | 1      |
| ^~     | 以某个字符串开头             | 2      |
| ~      | 区分大小写的正则匹配         | 3      |
| ~*     | 不区分大小写的正则匹配       | 4      |
| !~     | 区分大小写不匹配的正则       | 5      |
| !~*    | 不区分大小写不匹配的正则     | 6      |
| /      | 通用匹配,任何请求都会匹配到 | 7      |
location实验
server {
    listen       80;
    server_name  luffy.local;
    root   /usr/share/nginx/html/www;
    location / {
       return 200  "location / \n";
    }
    location = /images/ {
        return 200 "location = \n";
    }

    location /documents {
        return 200 "location /documents \n";
    }

    location /documents/ {
        return 200 "location /documents/ \n";
    }
    location ^~ /images/ {
        return 200 "location ^~ /images/ \n";

    }
    location ~* \.(gif|jpg|jpeg)$ {
        return 200 "location ~* \.(gif|jpg|jpeg) \n";
    }
}
location末尾有/和没有/的区别
在 Nginx 的 location 配置中,路径的结尾是否有斜杠(/)对匹配行为有影响

结尾有斜杠(/):
当 location 匹配规则以斜杠结尾时,通常意味着它指定了一个目录。Nginx 会匹配以此目录为前缀的所有请求路径,这包括目录本身和其下的任何子目录或文件。例如,location /images/ 会匹配 /images/、/images/photo.jpg、/images/subdir/ 等。

这种匹配是递归的,即它匹配所有在指定目录下的路径。

结尾没有斜杠:
当 location 匹配规则没有以斜杠结尾时,它将匹配以该路径为前缀的任何请求。这意味着它不仅匹配目录本身,还匹配以该路径开头的任何扩展路径。例如,location /image 将会匹配 /image、/image123 和 /images。
这种匹配不是基于目录的,而是基于前缀的。它不关心路径的结构是否符合目录或文件的逻辑,只要求请求的 URI 以指定的字符串开始。

实际应用:
如果你的目的是严格匹配一个目录及其子目录和文件,建议在 location 规则中加上尾部斜杠。
如果你想要匹配以某个字符串开头的所有路径,不论其后是否还有其他字符,就不要在 location 规则中加斜杠。
实验:
[root@web-7 /etc/nginx/conf.d]# cat default.conf
server {
    listen       80;
    server_name  www.luffy.com;
    root   /usr/share/nginx/html/www;

    location /one {
      root /code/www/;
      index index.html;
    }
}

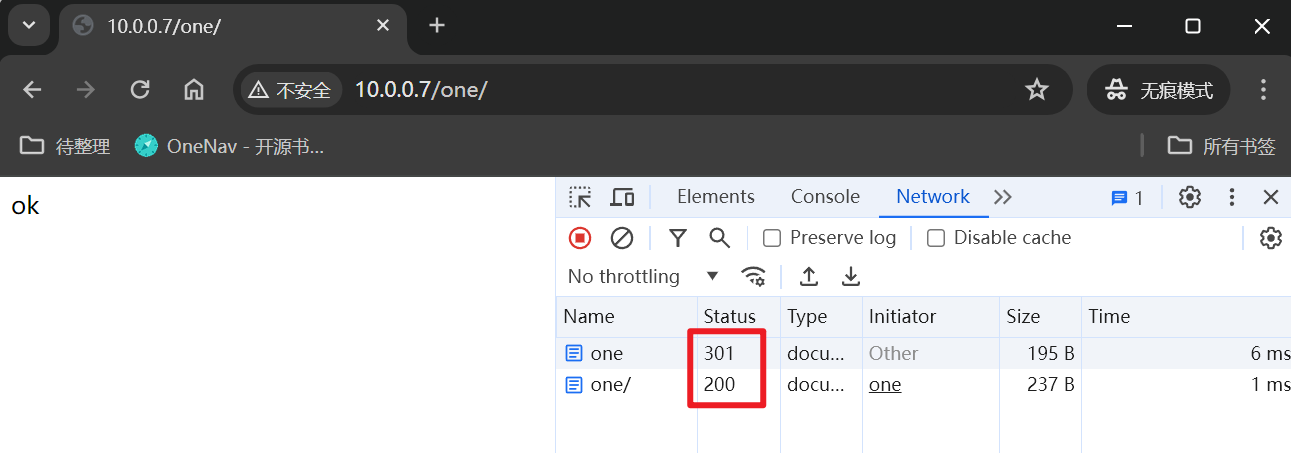
[root@web-7 /etc/nginx]# curl 10.0.0.7/one/
ok

[root@web-7 /etc/nginx]# curl 10.0.0.7/one
<html>
<head><title>301 Moved Permanently</title></head>
<body>
<h1>301 Moved Permanently</h1>
nginx/1.26.0
</body>
</html>

[root@web-7 /etc/nginx/conf.d]# curl -IL 10.0.0.7/one
HTTP/1.1 301 Moved Permanently
Server: nginx/1.26.0
Date: Tue, 28 May 2024 06:08:23 GMT
Content-Type: text/html
Content-Length: 169
Location: http://10.0.0.7/one/
Connection: keep-alive

HTTP/1.1 200 OK
Server: nginx/1.26.0
Date: Tue, 28 May 2024 06:08:23 GMT
Content-Type: text/html
Content-Length: 4
Last-Modified: Tue, 28 May 2024 06:05:07 GMT
Connection: keep-alive
ETag: "66557413-4"
Accept-Ranges: bytes
结论:
这个现象是典型的 Nginx 对于目录访问的处理行为。当你尝试访问一个目录(在这种情况下是 **/one**),但 URL 不以斜杠(**/**)结尾时,Nginx 会自动向客户端发送一个 301 重定向响应,以将 URL 重定向到以斜杠结尾的 URL(即 **/one/**)。这种行为的主要原因包括:

1. **目录斜杠规范**:这是一个 HTTP 标准实践,以确保目录 URL 的标准化。这样做的好处包括能够正确处理相对 URL 路径。例如,如果服务器返回一个相对链接 **index.html**,浏览器会基于当前 URL 来解析它。如果当前 URL 是 **/one**(没有斜杠),浏览器会将其解析为 **/index.html**,这是不正确的。如果 URL 是 **/one/**,则会正确解析为 **/one/index.html**。
2. **Nginx 配置**:在你的配置中,**location /one** 块设置了特定的根目录和索引文件。当你访问 **/one** 时,Nginx 查找的是 **/code/www/one** 目录下的 **index.html** 文件。由于 **/one** 实际上是一个目录,Nginx 将会自动添加斜杠并重定向到 **/one/** 来正确地处理请求。

这种自动添加斜杠并执行重定向的行为是 Nginx 默认的行为,用以确保目录访问的统一性和资源的正确访问。如果你想避免这种自动重定向,一个常见的方法是通过在配置文件中添加斜杠,直接在 **location** 块中指定目录路径,例如使用 **location /one/** 而不是 **location /one**。这样,访问 **/one** 就不会被视为对目录的请求,从而不会触发 301 重定向。
添加/后的实验效果: 此时访问10.0.0.7/one会被认为是访问的one文件,只有访问10.0.0.7/one/才会被认为访问的是one目录
[root@web-7 /etc/nginx/conf.d]# cat default.conf
server {
    listen       80;
    server_name  www.luffy.com;
    root   /usr/share/nginx/html/www;

    location /one/ {
      root /code/www/;
      index index.html;
    }
}

[root@web-7 /etc/nginx/conf.d]# curl 10.0.0.7/one
<html>
<head><title>404 Not Found</title></head>
<body>
<h1大于404 Not Found</h1>
nginx/1.26.0
</body>
</html>

[root@web-7 /etc/nginx/conf.d]# curl 10.0.0.7/one/
ok
[root@web-7 /etc/nginx/conf.d]#
location小结
1.location可以写多个,从上往下依次匹配

2.location匹配完一个就不再匹配其他的location

3.如果有多个location,应该把匹配范围最大的放最下面

4.如果所有的location都匹配不上,最后会匹配location /

5.如果location匹配末尾没有/,访问地址最后也没有/,nginx会尝试以目录形式访问,会自动发送客户端301跳转补全最后/
第x章 HTTP重写模块
1.模块介绍
**ngx_http_rewrite_module** 模块提供了几个重要的指令,用于控制 URI 的重写和重定向,包括 **rewrite**、**return** 和 **set** 等。

**rewrite** 指令通常用于根据正则表达式匹配并修改 URI。
2.重要指令
break				#中断配置

if					#请求判断

set					#设置变量

return				#返回状态或URL

rewrite				#对用户请求的URL或URI进行重写
3.跳转情景
不同域名之间跳转:
[http://www.360buy.com/](http://www.360buy.com/) 301

[http://www.jd.com/](http://www.jd.com/)     302

[https://www.jd.com/](https://www.jd.com/)    200
同域名的http跳转到https
[http://www.luffycity.com/](http://www.luffycity.com/)  301

[https://www.luffycity.com/](https://www.luffycity.com/) 200
http跳转https
[http://www.luffycity.com/](http://www.luffycity.com/)  80

[https://www.luffycity.com/](https://www.luffycity.com/) 443
不同终端看到的页面不一样:
[https://www.luffycity.com/](https://www.luffycity.com/) 301

[https://m.luffycity.com/](https://m.luffycity.com/)   200
4.if 指令
4.1 使用场景
if指令可以根据Nginx内置的变量来做判断,以下是Nginx常用内置变量:
$remote_addr

$remote_user

$time_local

$request

$status

$body_bytes_sent

$http_referer

$http_user_agent

$http_x_forwarded_for
4.2 使用位置
if可以配置在server或location中。
4.3 语法格式
if (内置变量 匹配条件 匹配的值) \{

    执行的动作;

\}
4.4 匹配规则
=				#比较变量和字符串是否相等,相等则为true,不相等则为false

!=				#比较变量和字符串是否不相等,不相等则为true,不相等则为false

~				#区分大小写的正则匹配,匹配上则为true,不匹配则为false

!~				#区分大小写的正则匹配,不匹配则为true,匹配则为false

~*				#不区分大小写的正则匹配,匹配上则为true,不匹配则为false

!~*				#不区分大小写的正则匹配,不匹配则为true,匹配则为false
4.5 实验配置
cat >/etc/nginx/conf.d/if.conf << 'EOF'
server {
    listen       80;
    server_name  localhost;

    location /mall {
        # 判断用户IP
        if ($remote_addr = 10.0.0.8){
           return 555 "nonono! \n";
        }

        # 判断请求方法
        if ($request_method != GET){
           return 444 "method is not GET \n";
        }

        # 判断用户浏览器类型 精确匹配
        if ($http_user_agent = iphone) {
           return 200 "agent is iphone \n";
        }

        # 判断用户浏览器类型 区分大小写
        if ($http_user_agent ~ Android) {
           return 200 "agent is Android \n";
        }

        # 判断用户浏览器类型 不区分大小写
        if ($http_user_agent ~* Chrome) {
           return 200 "agent is Chrome \n";
        }

        # 判断用户浏览器类型 不区分大小写
        if ($http_user_agent ~* IE){
           return 444 "get out! \n";
        }

         return 200 "PC Chrome! \n";
    }

    location / {
       return 200 "location / \n";
    }
}
EOF
5.return 指令
5.1 指令作用
return的作用是当匹配上之后直接返回响应状态码或者重写URL或者返回状态码的同时显示文本。

return可以跳转到替他的域名

return后的指令不会在执行。
5.2 实验配置
cat >/etc/nginx/conf.d/if.conf << 'EOF'
server {
    listen       80;
    server_name  localhost;
    root   /usr/share/nginx/html/www;

    #如果不是GET则输出
    if ($request_method != GET){
       return 200 "method is not GET \n";
    }

    #如果是Edg浏览器,直接跳转到chrome下载地址
    if ($http_user_agent ~* Edg){
       return 301 https://www.google.cn/chrome/index.html;
    }

    location /mall {
        #客户端类型完全匹配iphone
        if ($http_user_agent = iphone) {
           return 200 "agent is iphone \n";
        }

        #客户端类型区分大小写匹配
        if ($http_user_agent ~* Android) {
           return 200 "agent is Android \n";
        }

        #客户端类型不区分大小写匹配
        if ($http_user_agent ~* Chrome) {
           return 200 "agent is Chrome \n";
        }

        return 200 "PC \n";
    }

    location / {
        return 200 "PC \n";
    }
}
EOF
6.set 指令
6.1 官方地址
[https://nginx.org/en/docs/http/ngx_http_rewrite_module.html#set](https://nginx.org/en/docs/http/ngx_http_rewrite_module.html#set)
6.2 语法格式
set $variable value;

set 变量名 值
6.3 实验配置
server {
    listen       80;
    server_name  localhost;

    #如果是Edg浏览器,直接跳转到chrome下载地址
	  set $ikun_agent $http_user_agent;

    if ($ikun_agent ~* Edg){
       return 301 https://www.google.cn/chrome/index.html;
    }
}
EOF
7.break 指令
7.1 官网地址
[https://nginx.org/en/docs/http/ngx_http_rewrite_module.html#break](https://nginx.org/en/docs/http/ngx_http_rewrite_module.html#break)
7.2 实验配置
server {
    listen       80;
    server_name  localhost;

	set $name kun;
	break;
	set $name jian;
	return 200 "no! \n";

	location / {
	   return 200 "ok! \n"
	}
}
8.rewrite指令--重点掌握
8.1 官方文档
[https://nginx.org/en/docs/http/ngx_http_rewrite_module.html#rewrite](https://nginx.org/en/docs/http/ngx_http_rewrite_module.html#rewrite)
8.2 指令说明
1)rewrite指令可以基于用户请求的RUI通过正则表达式的匹配来进行改写。

2)rewrite指令可以存在多条,并且按照次序依次执行

3)rewrite指令可以根据flag标志符对指令进一步处理

4)如果替换字符串以"http://"、"https://"或"$scheme"开头,则处理将停止,并将重定向返回到客户端。
8.3 语法格式
Syntax:	rewrite regex replacement [flag];

Default:	—

Context:	server, location, if

rewrite指令可以作用于server, location, if

rewrite regex replacement [flag];

rewrite 匹配规则 重写指令 [标志符];
8.4 标识符
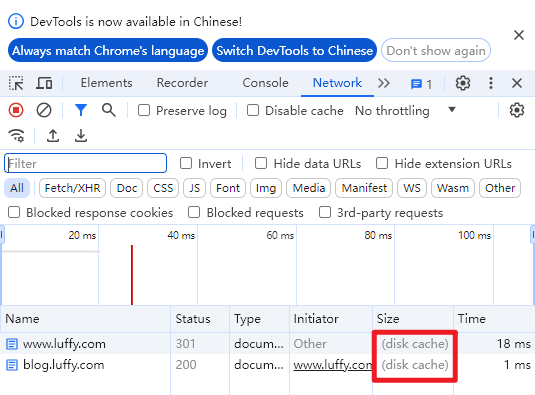
permanent	返回301永久重定向,浏览器地址会显示跳转后的URL地址,浏览器会缓存DNS记录

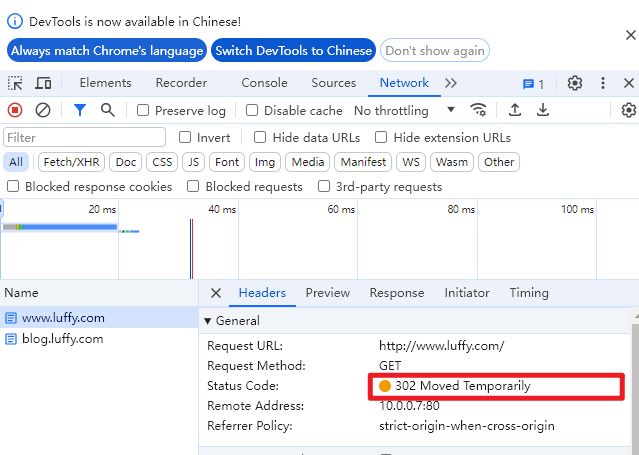
redirect	        返回302临时重定向,浏览器地址会显示跳转后的URL地址,浏览器不会缓存DNS记录

last	       浏览器显示的还是原来的URL,本条规则匹配完成后,继续向下匹配新的location URI规则

break      浏览器显示的还是原来的URL,本条规则匹配完成即终止,不再匹配后面的任何规则

使用场景区分:

使用redirect和permanent参数,浏览器会显示跳转后的URL,服务端将改写后的URL返回给客户端,由客户端重新发起新的请求。

使用last和break,浏览器显示的还是原来的URL,由服务器内部完成跳转。
8.5 实验-permanent 301 永久跳转
需求:
访问 http://www.luffy.com --> http://blog.luffy.com
实验环境:
cat > /etc/nginx/conf.d/www.conf << 'EOF'
server {
  listen 80 ;
  server_name www.luffy.com;
  access_log /var/log/nginx/www.log;
   location / {
     rewrite / http://blog.luffy.com permanent;
   }
}
EOF

cat > /etc/nginx/conf.d/blog.conf << 'EOF'
server {
  listen 80 default_server;
  server_name blog.luffy.com;
  access_log /var/log/nginx/blog.log;
  location / {
    root /code/blog/;
    index index.html;
  }
}
EOF

mkdir /code/blog -p
echo blog > /code/blog/index.html

nginx -t
systemctl restart nginx
浏览器记录状态:
DNS: www.luffy.com --> blog.luffy.com
页面缓存:
blog.luffy.com --> index.html
8.6 实验-redirect 302 临时跳转
需求:
访问 www.luffy.com --> blog.luffy.com
实验环境:
cat > /etc/nginx/conf.d/www.conf << 'EOF'
server   {
    listen       80;
    server_name  www.luffy.com;

    location / {
        rewrite / http://blog.luffy.com redirect;
    }
}
EOF

cat > /etc/nginx/conf.d/blog.conf << 'EOF'
server   {
    listen       80;
    server_name  blog.luffy.com;
    location / {
        root   /code/blog;
        index  index.html;
    }
}
EOF

mkdir /code/{www,blog} -p
echo www > /code/www/index.html
echo blog > /code/blog/index.html

nginx -t
systemctl restart nginx
浏览器记录状态:
DNS 不记录
页面缓存:
blog.luffy.com --> index.html
8.7 实验-反复横跳
需求:模仿京东跳转
[http://www.luffy.com/](http://www.luffy.com/) 	301

[http://blog.luffy.com/](http://blog.luffy.com/)     302

[https://blog.luffy.com/](https://blog.luffy.com/)    200
配置https证书
mkdir /opt/nginx/ssl_key
cd /opt/nginx/ssl_key
openssl genrsa -idea -out server.key 2048
输入密码:1234
openssl req -days 36500 -x509 -sha256 -nodes -newkey rsa:2048 -keyout server.key -out server.crt
www配置文件:
cat > /etc/nginx/conf.d/www.conf << 'EOF'
server   {
    listen       80;
    server_name  www.luffy.com;
    access_log  /var/log/nginx/www.log  main;
    location / {
        #rewrite / http://blog.luffy.com redirect;
        rewrite / http://blog.luffy.com permanent;
    }
}
EOF
blog配置文件:
cat > /etc/nginx/conf.d/blog.conf << 'EOF'
server   {
    listen       80;
    server_name  blog.luffy.com;
    access_log  /var/log/nginx/blog.log  main;
    rewrite / https://blog.luffy.com redirect;
}

server   {
    listen       443 ssl;
    server_name  blog.luffy.com;
    access_log  /var/log/nginx/blog.log  main;
    ssl_certificate /etc/nginx/ssl_key/server.crt;
    ssl_certificate_key /etc/nginx/ssl_key/server.key;

    location / {
        root   /code/blog;
        index  index.html;
    }
}
EOF
8.8 实验-带上原来的地址反复横跳
需求:跳转后还带上原来的地址
[http://pro.jd.com/mall/active/36yPbWm4JqFrmTgABydz6GkWNkca/index.html](http://pro.jd.com/mall/active/36yPbWm4JqFrmTgABydz6GkWNkca/index.html)  	302

[https://pro.jd.com/mall/active/36yPbWm4JqFrmTgABydz6GkWNkca/index.html](https://pro.jd.com/mall/active/36yPbWm4JqFrmTgABydz6GkWNkca/index.html) 	200
我们现在的状况:
[http://blog.luffy.com/123.html](http://blog.luffy.com/123.html)		302

[https://blog.luffy.com/](https://blog.luffy.com/)				200
修改后的blog配置文件
cat > /etc/nginx/conf.d/blog.conf << 'EOF'
server   {
    listen       80;
    server_name  blog.luffy.com;
    access_log  /var/log/nginx/blog.log  main;
    rewrite /(.*) https://blog.luffy.com/$1 redirect;
}

server   {
    listen       443 ssl;
    server_name  blog.luffy.com;
    access_log  /var/log/nginx/blog.log  main;
    ssl_certificate /etc/nginx/ssl_key/server.crt;
    ssl_certificate_key /etc/nginx/ssl_key/server.key;

    location / {
        root   /code/blog;
        index  index.html;
    }
}
EOF
8.9 实验-last实验
需求:
访问  bbs.luffy.com/AAA

跳转到 bbs.luffy.com/BBB

然后再跳转到  bbs.luffy.com/CCC

跳转流程:

bbs.luffy.com/AAA/(123.html) --> bbs.luffy.com/BBB/123.html

bbs.luffy.com/BBB/(123.html) --> bbs.luffy.com/CCC/123.html
实验配置:
cat > /etc/nginx/conf.d/bbs.conf << 'EOF'
server   {
    listen       80;
    server_name  bbs.luffy.com;
	access_log  /var/log/nginx/bbs.log  main;

    location /CCC {
        root   /code/bbs;
        index  index.html;
    }

    location /BBB {
        rewrite ^/BBB/(.*)$ /CCC/$1 last;
    }

    location /AAA {
        rewrite ^/AAA/(.*)$ /BBB/$1 last;
    }
}
EOF

mkdir /code/bbs/CCC -p
echo bbs > /code/bbs/CCC/index.html

nginx -t
systemctl restart nginx
跳转效果:
用户只请求一次

Nginx内部处理了3次

用户看到的页面是CCC的内容,但是浏览器里的地址栏还是原来的AAA
8.10 实验-break实验
cat > /etc/nginx/conf.d/bbs.conf << 'EOF'
server   {
    listen       80;
    server_name  bbs.luffy.com;
    access_log  /var/log/nginx/bbs.log  main;

    location /CCC {
    		root   /code/bbs;
        index  index.html;
    }

    location /BBB {
        rewrite ^/BBB/(.*)$ /CCC/$1 last;
    }

    location /AAA {								        #bbs.luffy.com/AAA/index.html
        rewrite ^/AAA/(.*)$ /BBB/$1 break;				#bbs.luffy.com/BBB/index.html
    		root   /code/bbs;							#/code/bbs/BBB/index.html
        index  index.html;
        return 444 "AAA!";
    }
}
EOF
总结: last和break区别
last标记在本条规则匹配完成后,对其所在的server标签重新发起修改后的URL请求,再次匹配location。

break标记则会在本条规则匹配完成后,终止匹配,不会在匹配后面的规则。
8.11 实验-带参数跳转
需求1:
访问 	www.luffy.com/img/2024/05/26/linux.jpg

跳转到      img.luffy.com/index.php?name=2024-05-26-linux.jpg
配置文件:
cat > /etc/nginx/conf.d/www.conf << 'EOF'
server   {
    listen       80;
    server_name  www.luffy.com;
    access_log  /var/log/nginx/www.log  main;
    location /img {
        rewrite ^/img/([0-9]+)/([0-9]+)/([0-9]+)/(.*)$ http://img.luffy.com/index.php?name=$1-$2-$3-$4 permanent;
    }
}
EOF
需求2:
访问  	www.luffy.com/index.php?name=2021-05-10-linux.jpg

跳转到 	img.luffy.com/img/2021/05/10/linux.jpg
配置文件:
server   {
    listen       80;
    server_name  www.luffy.com;
    access_log  /var/log/nginx/www.log  main;
    location / {
        if ($query_string ~* "name=(\d+)-(\d+)-(\d+)-(.*)") {
           set $y $1;
           set $m $2;
           set $d $3;
           set $name $4;
           rewrite ^/index.php http://img.luffy.com/img/$y/$m/$d/$name? permanent;
        }
    }
}
注意:
[https://nginx.org/en/docs/http/ngx_http_rewrite_module.html#rewrite](https://nginx.org/en/docs/http/ngx_http_rewrite_module.html#rewrite)

rewrite不能直接使用?name=xxx的内容,需要先使用内置变量提取出参数后的内容,然后再赋值给自定义变量

跳转后添加?就可以避免参数再次追加

If a replacement string includes the new request arguments, the previous request arguments are appended after them. If this is undesired, putting a question mark at the end of a replacement string avoids having them appended, for example:

rewrite ^/users/(.*)$ /show?user=$1? last;
第x章 HTTP日志模块
官方文档
[https://nginx.org/en/docs/http/ngx_http_log_module.html](https://nginx.org/en/docs/http/ngx_http_log_module.html)
关键指令
Syntax:	**access_log** path [format [buffer=size] [gzip[=level]] [flush=time] [if=condition]];

                **access_log off**;

Default:	access_log logs/access.log combined;

Context:	http, server, location, if in location, limit_except
默认配置
log_format  main  '$remote_addr - $remote_user [$time_local] "$request" '
                    '$status $body_bytes_sent "$http_referer" '
                    "$http_user_agent" "$http_x_forwarded_for"';

access_log  /var/log/nginx/access.log  main;
日志字段变量解释
$remote_addr 		#记录客户端 IP 地址

$remote_user 			#记录客户端用户名

$time_local 			#记录通用的本地时间

$time_iso8601 		#记录 ISO8601 标准格式下的本地时间

$request 				#记录请求的方法以及请求的 http 协议

$status 				#记录请求状态码(用于定位错误信息)

$body_bytes_sent 		#发送给客户端的资源字节数,不包括响应头的大小

$bytes_sent 			#发送给客户端的总字节数

$msec 				#日志写入时间。单位为秒,精度是毫秒。

$http_referer 			#记录从哪个页面链接访问过来的

$http_user_agent 		#记录客户端浏览器相关信息

$http_x_forwarded_for 	#记录客户端 IP 地址

$request_length 		#请求的长度(包括请求行, 请求头和请求正文)。

$request_time 		#请求花费的时间,单位为秒,精度毫秒


# 注:如果 Nginx 位于负载均衡器, nginx 反向代理之后, web 服务器无法直接获取到客 户端真实的 IP 地址。


# $remote_addr 获取的是反向代理的 IP 地址。 反向代理服务器在转发请求的 http 头信息中,


# 增加 X-Forwarded-For 信息,用来记录客户端 IP 地址和客户端请求的服务器地址。
参考的json日志配置
精简版
    log_format json '{ "time_local": "$time_local", '
                          '"remote_addr": "$remote_addr", '
                          '"referer": "$http_referer", '
                          '"request": "$request", '
                          '"status": $status, '
                          '"bytes": $body_bytes_sent, '
                          '"user_agent": "$http_user_agent", '
                          '"x_forwarded": "$http_x_forwarded_for", '
                          '"up_addr": "$upstream_addr",'
                          '"up_host": "$upstream_http_host",'
                          '"upstream_time": "$upstream_response_time",'
                          '"request_time": "$request_time"'
    ' }';
    access_log  /var/log/nginx/access.log  json;
完整版-解析IP地址需要将geoip模块编译进去
        log_format json_analytics escape=json '{'
                   '"msec": "$msec", ' # request unixtime in seconds with a milliseconds resolution
                   '"connection": "$connection", ' # connection serial number
                   '"connection_requests": "$connection_requests", ' # number of requests made in connection
                   '"pid": "$pid", ' # process pid
                   '"request_id": "$request_id", ' # the unique request id
                   '"request_length": "$request_length", ' # request length (including headers and body)
                   '"remote_addr": "$remote_addr", ' # client IP
                   '"remote_user": "$remote_user", ' # client HTTP username
                   '"remote_port": "$remote_port", ' # client port
                   '"time_local": "$time_local", '
                   '"time_iso8601": "$time_iso8601", ' # local time in the ISO 8601 standard format
                   '"request": "$request", ' # full path no arguments of the request
                   '"request_uri": "$request_uri", ' # full path and arguments of the request
                   '"args": "$args", ' # args
                   '"status": "$status", ' # response status code
                   '"body_bytes_sent": "$body_bytes_sent", ' # the number of body bytes exclude headers sent to a client
                   '"bytes_sent": "$bytes_sent", ' # the number of bytes sent to a client
                   '"http_referer": "$http_referer", ' # HTTP referer
                   '"http_user_agent": "$http_user_agent", ' # user agent
                   '"http_x_forwarded_for": "$http_x_forwarded_for", ' # http_x_forwarded_for
                   '"http_host": "$http_host", ' # the request Host: header
                   '"server_name": "$server_name", ' # the name of the vhost serving the request
                   '"request_time": "$request_time", ' # request processing time in seconds with msec resolution
                   '"upstream": "$upstream_addr", ' # upstream backend server for proxied requests
                   '"upstream_connect_time": "$upstream_connect_time", ' # upstream handshake time incl. TLS
                   '"upstream_header_time": "$upstream_header_time", ' # time spent receiving upstream headers
                   '"upstream_response_time": "$upstream_response_time", ' # time spent receiving upstream body
                   '"upstream_response_length": "$upstream_response_length", ' # upstream response length
                   '"upstream_cache_status": "$upstream_cache_status", ' # cache HIT/MISS where applicable
                   '"ssl_protocol": "$ssl_protocol", ' # TLS protocol
                   '"ssl_cipher": "$ssl_cipher", ' # TLS cipher
                   '"scheme": "$scheme", ' # http or https
                   '"request_method": "$request_method", ' # request method
                   '"server_protocol": "$server_protocol", ' # request protocol, like HTTP/1.1 or HTTP/2.0
                   '"pipe": "$pipe", ' # "p" if request was pipelined, "." otherwise
                   '"gzip_ratio": "$gzip_ratio"'
                   '}';
第x章 HTTP认证模块
官方文档
[http://nginx.org/en/docs/http/ngx_http_auth_basic_module.html](http://nginx.org/en/docs/http/ngx_http_auth_basic_module.html)
配置语法
Syntax: auth_basic string| off;

Default: auth_basic off;

Context: http, server, location, limit_except

Syntax: auth_basic_user_file file;

Default: -

Context: http, server, location, limit_except
配置实验
安装生成密码工具:
yum install httpd-tools -y
创建新的密码文件, -c 创建新文件 -b 允许命令行输入密码:
htpasswd -b -c /etc/nginx/auth_conf luffy luffy
nginx子配置:
cat >/etc/nginx/conf.d/01-www.conf <EOF
server   {
    listen       80;
    server_name  www.luffy.com;
    location / {
        auth_basic "Auth access Blog Input your Passwd!";
        auth_basic_user_file auth_conf;
        root   /usr/share/nginx/html/www;
        index  index.html index.htm;
    }
}
EOF
第x章 HTTP访问模块
官方文档
[http://nginx.org/en/docs/http/ngx_http_access_module.html](http://nginx.org/en/docs/http/ngx_http_access_module.html)
配置语法
Syntax: allow address | CIDR | unix: | all;

Default: —

Context: http, server, location, limit_except

Syntax: deny address | CIDR | unix: | all;

Default: —

Context: http, server, location, limit_except
配置实验
实验1:拒绝windows访问www域名
cat > /etc/nginx/conf.d/01-www.conf <<EOF
server   {
    listen       80;
    server_name  www.luffy.com;
    location / {
        root   /usr/share/nginx/html/www;
        index  index.html index.htm;
        deny 10.0.0.1;
        allow all;
    }
}
EOF
实验2:只允许windows访问,其他全部拒绝
cat >/etc/nginx/conf.d/01-www.conf<<EOF
server   {
    listen       80;
    server_name  www.oldzhang.com;
    location / {
        root   /usr/share/nginx/html/www;
        index  index.html index.htm;
        allow 10.0.0.1;
        deny all;
    }
}
EOF
第x章 HTTP限速模块
官方文档
[http://nginx.org/en/docs/http/ngx_http_limit_req_module.html](http://nginx.org/en/docs/http/ngx_http_limit_req_module.html)
配置语法
Syntax: limit_req_zone key zone=name:size rate=rate;

Default: —

Context: http

Syntax: limit_conn zone number [burst=number] [nodelay];

Default: —

Context: http, server, location
参数解释
定义一条规则

limit_req_zone $binary_remote_addr zone=one:10m rate=1r/s;

limit_req_zone 				#引用限速模块

$binary_remote_addr 			#客户端 IP 地址,以二进制形式存储,用于标识来源。

zone=one:10m 				#共享内存中创建名为“one”的存储区,大小为10MB,用于记录IP地址和请求时间。

rate=1r/s;					#允许的请求率为每秒1次请求。

引用一条限速规则

limit_req zone=two burst=5 nodelay;

limit_req 						#引用限速规则语法

zone=one 					#引用哪一条规则

burst=5 						#允许突发请求量最多5个请求。超过这个数量的请求将被延迟处理或返回错误。

nodelay;						#即使突发请求量已满,也立即处理请求,而不是延迟它们
配置实验
cat >/etc/nginx/conf.d/01-www.conf <<EOF
limit_req_zone $binary_remote_addr zone=req_zone:10m rate=1r/s;
server   {
    listen       80;
    server_name  www.luffy.com;
    limit_req zone=req_zone burst=3 nodelay;
    access_log  /var/log/nginx/www.access.log  main;
    location / {
        root   /usr/share/nginx/html/www;
        index  index.html index.htm;
    }
}
EOF
访问测试
ab压测
yum install httpd-tools -y
ab -n 20 -c 2 http://www.luffy.com/
for循环
一秒1次
for i in {1..10000};do curl -I 10.0.0.7;sleep 1;done

一秒2次
for i in {1..10000};do curl -I 10.0.0.7;sleep 0.5;done

一秒5次
for i in {1..10000};do curl -I 10.0.0.7;sleep 0.2;done
第x章 HTTP索引模块
官方文档
[http://nginx.org/en/docs/http/ngx_http_autoindex_module.html](http://nginx.org/en/docs/http/ngx_http_autoindex_module.html)
配置语法
Syntax: autoindex on | off;

Default: autoindex off;

Context: http, server, location

Syntax:	autoindex_exact_size on | off;

Default:

autoindex_exact_size on;

Context:	http, server, location

Syntax:	autoindex_format html | xml | json | jsonp;

Default:

autoindex_format html;

Context:	http, server, location

This directive appeared in version 1.7.9.

Syntax:	autoindex_format html | xml | json | jsonp;

Default:

autoindex_format html;

Context:	http, server, location

This directive appeared in version 1.7.9.

Syntax:	autoindex_localtime on | off;

Default:

autoindex_localtime off;

Context:	http, server, location
配置解释
autoindex_exact_size off;

默认为 on, 显示出文件的确切大小,单位是 bytes。

修改为 off,显示出文件的大概大小,单位是 kB 或者 MB 或者 GB。

autoindex_localtime on;

默认为 off,显示的文件时间为 GMT 时间。

修改为 on, 显示的文件时间为文件的服务器时间。

charset utf-8,gbk;

默认中文目录乱码,添加上解决乱码
配置实验
cat >/etc/nginx/conf.d/download.conf <<EOF
server {
    listen 80;
    server_name download.oldzhang.com;
    location / {
        root /usr/share/nginx/html/download;
        charset utf-8,gbk;
        autoindex on;
        autoindex_localtime on;
        autoindex_exact_size off;
    }
}
EOF
第x章 HTTP压缩模块
官方文档
[https://nginx.org/en/docs/http/ngx_http_gzip_module.html](https://nginx.org/en/docs/http/ngx_http_gzip_module.html)
指令语法
Syntax:	**gzip on | off**;

Default:	gzip off;

Context:	http, server, location, if in location

Syntax:	**gzip_buffers** number size;

Default:	gzip_buffers 32 4k|16 8k;

Context:	http, server, location

Syntax:	**gzip_comp_level** level;

Default:	gzip_comp_level 1;

Context:	http, server, location

Syntax:	**gzip_disable** regex ...;

Default:	—

Context:	http, server, location

This directive appeared in version 0.6.23.

Syntax:	**gzip_http_version** 1.0 | 1.1;

Default:	gzip_http_version 1.1;

Context:	http, server, location

Syntax:	**gzip_min_length** length;

Default:	gzip_min_length 20;

Context:	http, server, location

Syntax:	**gzip_proxied** off | expired | no-cache | no-store | private | no_last_modified | no_etag | auth | any ...;

Default:	gzip_proxied off;

Context:	http, server, location

Syntax:	**gzip_types** mime-type ...;

Default:	gzip_types text/html;

Context:	http, server, location

Syntax:	**gzip_vary** on | off;

Default:	gzip_vary off;

Context:	http, server, location
指令解释
**gzip on; **  启用或禁用 gzip 压缩。

**gzip_min_length 1000;**   响应体超过1000字节时压缩。

**gzip_types text/plain text/css application/json;**  压缩文本、CSS 和 JSON 类型的数据

**gzip_comp_level 6;**  设置压缩级别为6,数值越大压缩比越高,但处理时间也越长。

**gzip_buffers 16 8k;**  使用16个8kB的缓冲区进行压缩。

**gzip_proxied any;    **无论请求是直接的还是经过代理的,都进行压缩。

**gzip_disable "MSIE [1-6]\.";**   对 IE6 及以下版本不压缩。
参考配置
http {
    gzip on;
    gzip_min_length 1000;
    gzip_types text/plain text/css application/json application/javascript;
    gzip_comp_level 6;
    gzip_buffers 16 8k;
    gzip_proxied any;
    gzip_disable "MSIE [1-6]\.";
    server {
        listen 80;
        server_name example.com;
        location / {
            root /usr/share/nginx/html;
            index index.html index.htm;
        }
    }
}
实验测试
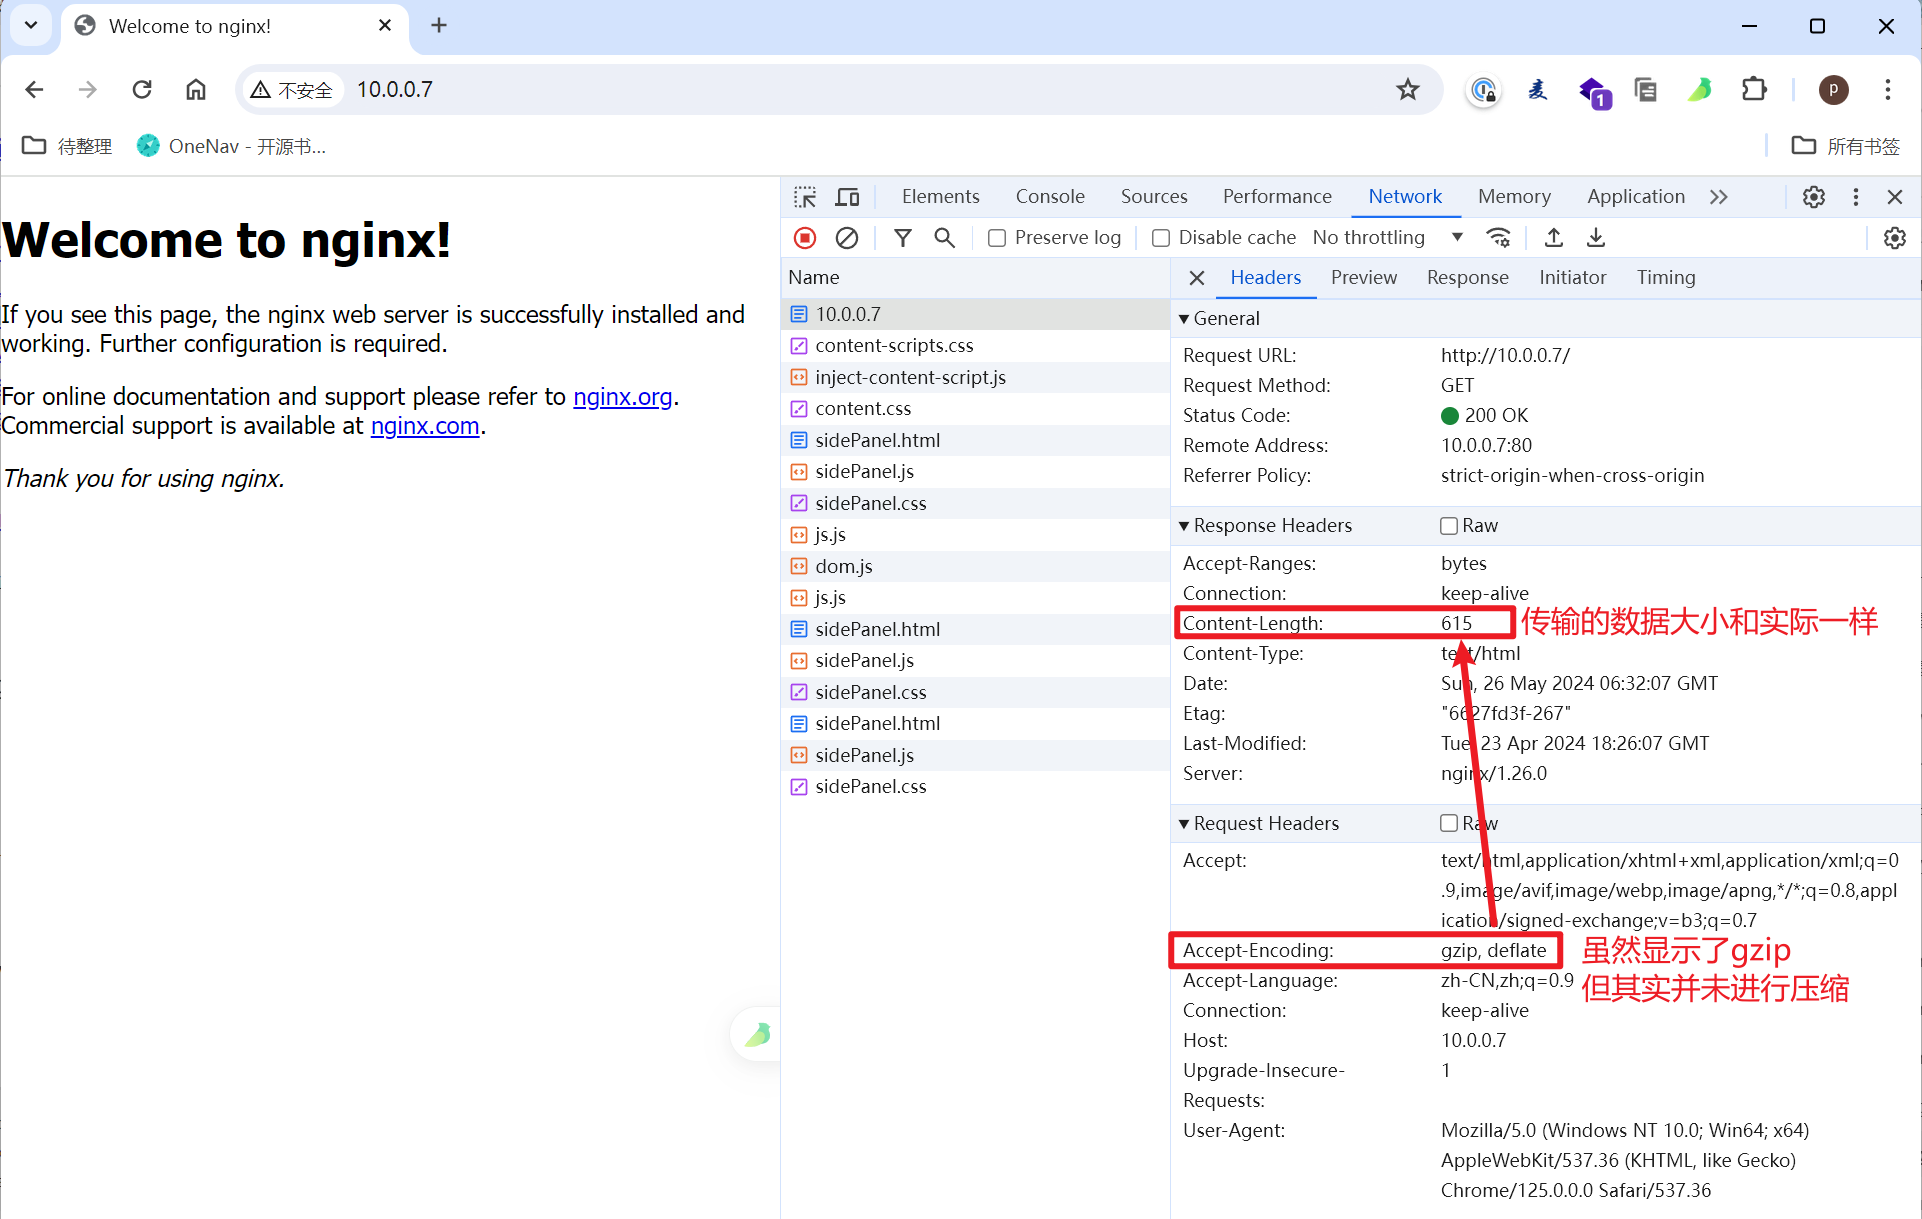
未开启压缩时
Linux上使用curl测试
[root@web-7 ~]# curl -I -H "Accept-Encoding: gzip, deflate" http://10.0.0.7
HTTP/1.1 200 OK
Server: nginx/1.26.0
Date: Sun, 26 May 2024 06:34:45 GMT
Content-Type: text/html
Content-Length: 615
Last-Modified: Tue, 23 Apr 2024 18:26:07 GMT
Connection: keep-alive
ETag: "6627fd3f-267"
Accept-Ranges: bytes
页面访问
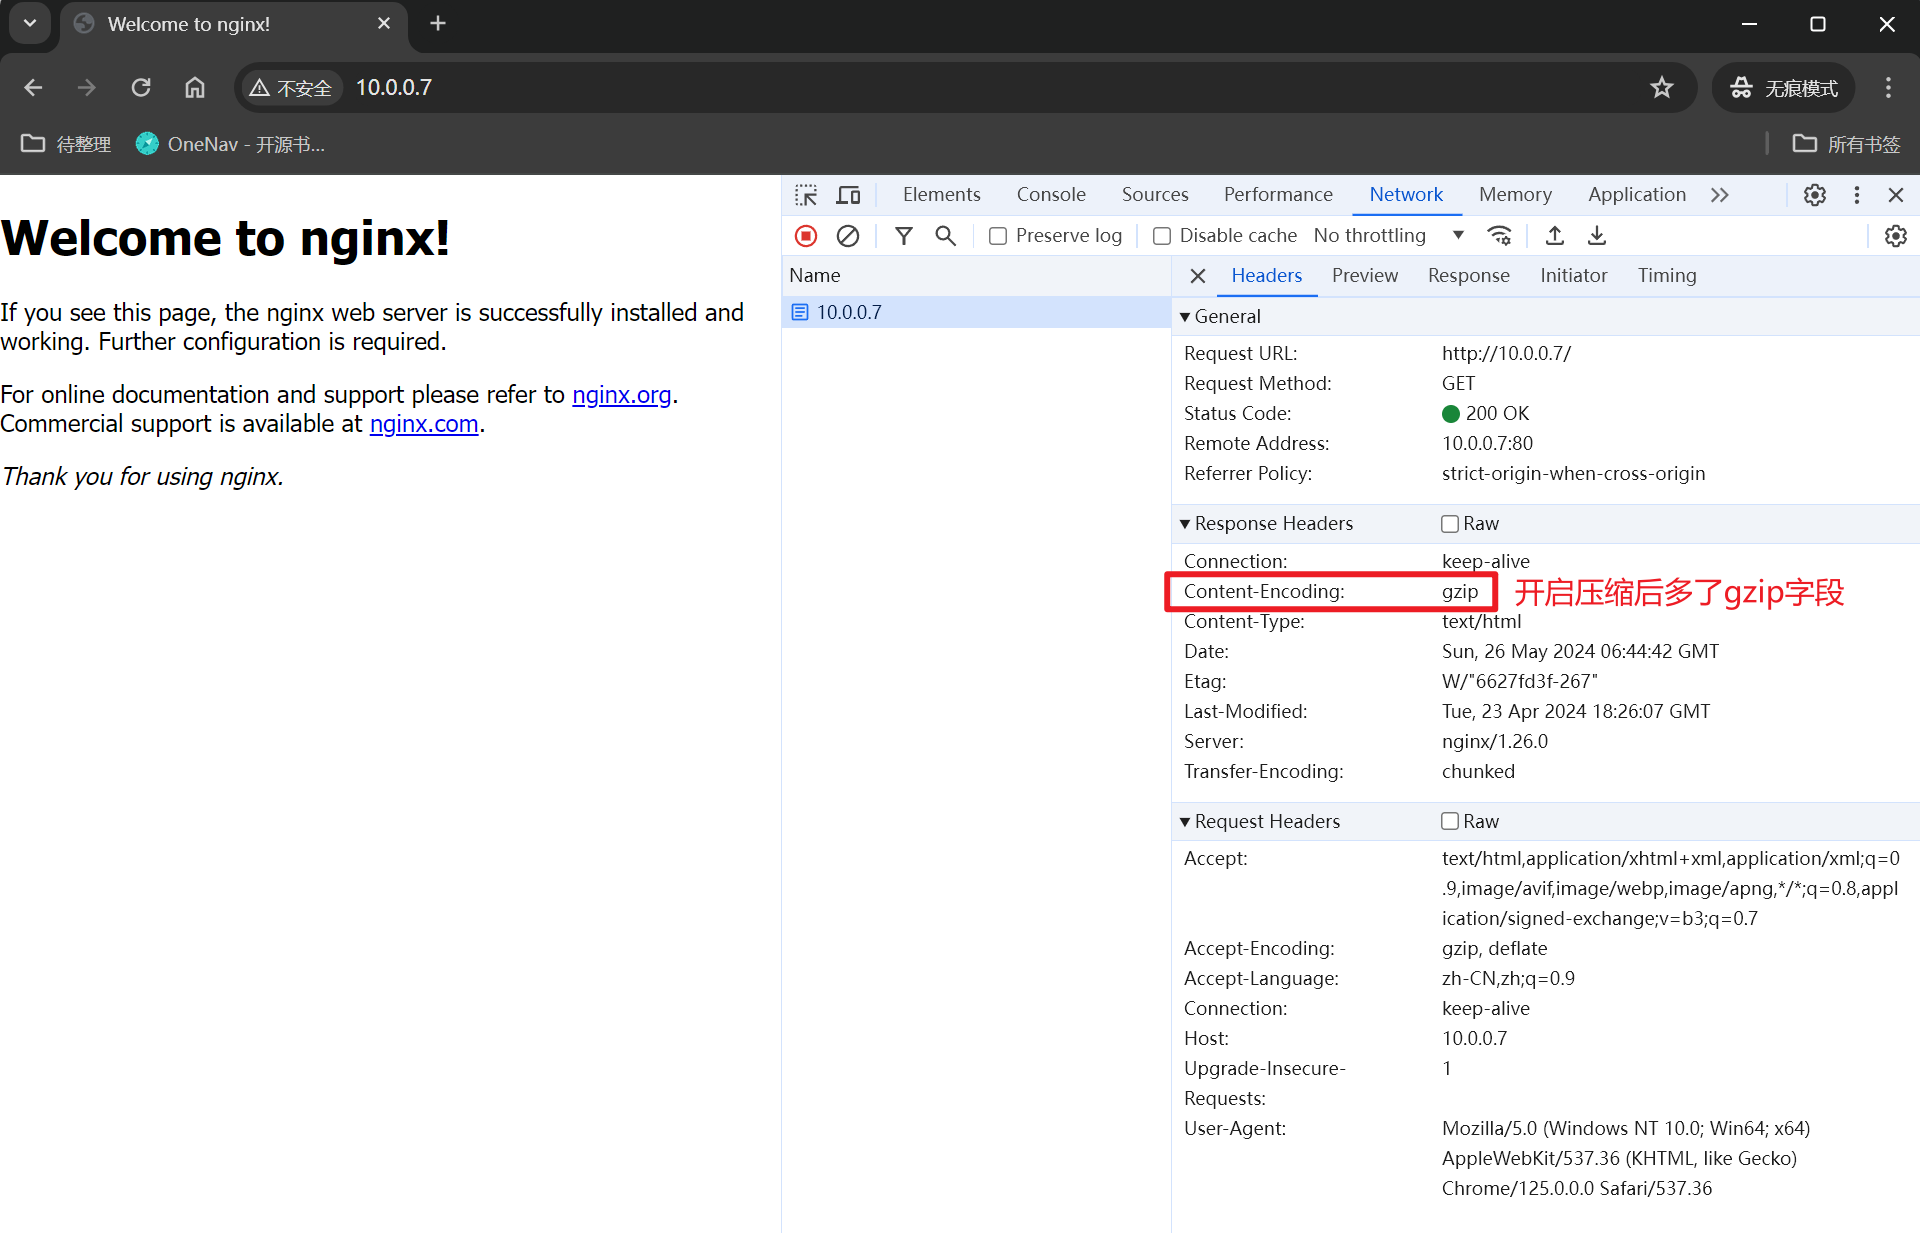
开启压缩后
Linux上使用curl测试
[root@web-7 /usr/share/nginx/html]# curl -I -H "Accept-Encoding: gzip, deflate" http://10.0.0.7
HTTP/1.1 200 OK
Server: nginx/1.26.0
Date: Sun, 26 May 2024 06:36:26 GMT
Content-Type: text/html
Last-Modified: Tue, 23 Apr 2024 18:26:07 GMT
Connection: keep-alive
ETag: W/"6627fd3f-267"
Content-Encoding: gzip
页面访问
Request Headers和Response Headers的区别
请求头(Request Headers)
**作用**:请求头是由客户端发送给服务器,用来提供执行请求所需的上下文信息,或者说明客户端的偏好和能力。

**内容**:请求头可能包括如下信息:

+ **Accept**:客户端能够接收的内容类型,如 **text/html**。
+ **Accept-Encoding**:客户端支持的压缩格式,如 **gzip, deflate**。
+ **User-Agent**:客户端的身份标识,通常包括浏览器类型、版本等。
+ **Cookie**:存储在客户端的数据,用于服务器识别或追踪客户端状态。
+ **Authorization**:包含认证信息,如用户名和密码。

**目的**:帮助服务器更好地理解请求的性质和处理请求的方式。
响应头(Response Headers)
**作用**:响应头是服务器回应一个 HTTP 请求时发送给客户端的,用于提供如何处理响应的信息。

**内容**:响应头可能包括如下信息:

+ **Content-Type**:响应内容的类型,如 **text/html**。
+ **Content-Encoding**:响应内容的编码方式,如 **gzip** 表示内容已被 gzip 压缩。
+ **Set-Cookie**:向客户端发送 cookie。
+ **Cache-Control**:指示响应内容的缓存策略。
+ **Expires**:响应过期时间。

**目的**:告诉客户端如何处理接收到的数据,包括如何解析、显示或缓存数据。
为什么对低版本的浏览器禁用压缩?
对于旧版的 Internet Explorer 浏览器(尤其是6及以下版本)禁用 gzip 压缩的主要原因是这些浏览器在处理压缩内容时存在兼容性问题和已知的 bug。这些问题可能导致页面内容在浏览器中显示不正确或根本不显示,给用户体验带来负面影响。以下是一些具体的原因:

1. **压缩缺陷**: 旧版 IE 浏览器(特别是 IE6)存在一个缺陷,即当这些浏览器从代理服务器接收经过 gzip 压缩的内容时,可能无法正确解压缩这些内容。这可能导致页面无法加载或显示错误。
2. **Vary 响应头问题**: IE6 在处理包含 "Vary" 响应头的 HTTP 响应时存在问题。如果服务器响应中包含了如 **Vary: Accept-Encoding** 的头部(这在使用内容编码时是常见的做法),IE6 可能不会缓存这些响应,导致每次请求都从服务器重新加载内容,影响效率和性能。
3. **缓存和性能问题**: 由于上述的缓存处理问题,即使内容已经通过 gzip 压缩减少了传输的数据量,IE6 用户的实际体验可能会因为频繁的完整页面加载而受到影响。

因此,为了确保网站对所有用户提供一致的访问体验,网站开发者和管理员通常会在服务器配置中特别禁用对旧版 IE 浏览器的内容压缩。这样可以避免兼容性问题,确保旧版浏览器用户能够正常浏览网页。
测试访问
[root@web-7 /code/www]# curl -H "Accept-Encoding: gzip" -A "MSIE 6." -I 10.0.0.7/

HTTP/1.1 200 OK

Server: nginx/1.26.0

Date: Tue, 28 May 2024 06:53:38 GMT

Content-Type: text/html

Content-Length: 407425

Last-Modified: Tue, 28 May 2024 06:41:45 GMT

Connection: keep-alive

ETag: "66557ca9-63781"

Accept-Ranges: bytes
第x章 HTTP状态模块
官方文档
[http://nginx.org/en/docs/http/ngx_http_stub_status_module.html](http://nginx.org/en/docs/http/ngx_http_stub_status_module.html)
配置语法
Syntax:	stub_status;

Default:	—

Context:	server, location
配置实验
cat > /etc/nginx/conf.d/status.conf <<EOF
server {
   listen 80;
   server_name  status.luffy.com;
   stub_status on;
   access_log off;
}
EOF
状态解释
**Active connections: N**:当前有N个活跃的连接。

**server accepts handled requests**:下一行的三个数字代表:

+ Nginx 自启动以来接受的连接总数。
+ Nginx 成功处理的连接总数。
+ Nginx 自启动以来处理的请求数量。

**Reading: N**:当前有N个连接在读取客户端的请求。

**Writing: N**:当前有N个连接在向客户端发送数据。

**Waiting: N**:当前在等待状态的连接数为N。
第x章 HTTP GeoIP模块
官方文档
[https://nginx.org/en/docs/http/ngx_http_geoip_module.html](https://nginx.org/en/docs/http/ngx_http_geoip_module.html)

[https://github.com/leev/ngx_http_geoip2_module](https://github.com/leev/ngx_http_geoip2_module)
版本区别
**ngx_http_geoip_module** 和 **ngx_http_geoip2_module** 都是 Nginx 用于地理位置识别的模块,但它们使用不同版本的 MaxMind GeoIP 数据库,并有一些关键的技术和功能差异。


### ngx_http_geoip_module

+ **数据源**:使用的是较旧的 MaxMind GeoIP 数据库(现在称为 GeoIP Legacy)。
+ **功能**:支持基于 IP 地址的国家和城市定位,以及其他一些基本的地理信息,如地区、互联网服务提供商(ISP)等。
+ **配置**:相对简单,主要是在 Nginx 配置文件中指定数据库文件的位置,并设置相应的变量。
+ **限制**:不支持较新的 GeoIP2 数据库格式,功能上相对有限。


### ngx_http_geoip2_module

+ **数据源**:使用的是更新的 MaxMind GeoIP2 数据库,也支持 GeoLite2 数据库,提供更精准和更详细的地理位置数据。
+ **功能**:除了支持国家和城市定位外,还支持更多细致的数据,如邮政编码、经纬度、时区等。
+ **配置**:配置更灵活,支持多种查询和多个数据库同时使用,能够定义复杂的条件和输出更多的变量。
+ **兼容性**:兼容 GeoIP2 和 GeoLite2 数据格式,与 MaxMind 的最新数据库和 API 保持一致。


### 主要技术差异

1. **数据库格式**:**ngx_http_geoip2_module** 能够使用更现代的数据库格式(mmdb),而 **ngx_http_geoip_module** 使用的是旧格式(dat)。
2. **功能丰富度**:GeoIP2 提供更丰富的数据和更精细的控制,而 GeoIP Legacy 主要集中在基础的国家和城市数据。
3. **配置灵活性**:**ngx_http_geoip2_module** 在配置上提供更多的灵活性,支持条件判断和复杂的配置设置。


### 升级建议

由于 MaxMind 已经停止更新 GeoIP Legacy 数据库,推荐使用 **ngx_http_geoip2_module**,尤其是在新的部署和需要更详尽数据的应用场景中。这不仅确保了更好的数据准确性和详细程度,也保证了对未来可能的数据库格式或 API 变化的兼容性。

使用 **ngx_http_geoip2_module** 通常需要在编译 Nginx 时明确添加此模块,并确保有适当的 GeoIP2 或 GeoLite2 数据库文件。这为提供基于地理位置的定制内容、安全控制和用户分析等功能提供了支持。
关键指令
Syntax:	geoip_country file;

Default:	—

Context:	http

Syntax:	geoip_city file;

Default:	—

Context:	http

Syntax:	geoip_proxy address | CIDR;

Default:	—

Context:	http

This directive appeared in versions 1.3.0 and 1.2.1.

Syntax:	geoip_proxy_recursive on | off;

Default:

geoip_proxy_recursive off;

Context:	http
指令解释
**geoip_country ** file         国家信息的 GeoIP 数据库文件的路径

**geoip_city** file              城市级地理位置查找的数据库文件的路径

**geoip_proxy** address   告诉Nginx哪些是Nginx代理的IP

**geoip_proxy_recursive **on    Nginx 知道在解析代理链中的 IP 地址时,哪些 IP 是代理 IP(这些是不需要进一步解析为客户端位置的),并且确保只有代理之外的 IP 地址被认为是实际的客户端 IP 地址
参考配置
geoip
http {
    geoip_country         GeoIP.dat;
    geoip_city                GeoLiteCity.dat;
    geoip_proxy            192.168.100.0/24;
    geoip_proxy_recursive on;
    ....
geoip2
http {
    # 指定 GeoIP2 数据库文件的位置,这里使用的是城市数据库
    geoip2 /etc/nginx/geoip/GeoLite2-City.mmdb {
        # 从 GeoLite2-City 数据库中获取国家ISO代码,并将其存储在变量$geoip2_metadata_country_iso_code中
        $geoip2_metadata_country_iso_code country iso_code;
        # 从 GeoLite2-City 数据库中获取城市名称(英文),并将其存储在变量$geoip2_data_city_name中
        $geoip2_data_city_name city names en;
    }

    # 指定另一个 GeoIP2 数据库文件的位置,这次使用的是国家数据库
    geoip2 /etc/nginx/geoip/GeoLite2-Country.mmdb {
        # 从 GeoLite2-Country 数据库中获取国家ISO代码,并将其存储在变量$geoip2_data_country_code中
        $geoip2_data_country_code country iso_code;
    }

    # 定义一个服务器监听请求
    server {
        # 定义处理所有请求的位置块
        location / {
            # 如果从IP解析得到的国家代码为"CN"(中国),则重定向到特定的中国域名
            if ($geoip2_data_country_code = 'CN') {
                return 302 http://cn.example.com$request_uri;
            }

            # 如果不满足上述条件,将请求转发到后端服务器
            proxy_pass http://backend;
        }
    }
}
日志解析变量
geoip
"geoip_country_code": "$geoip_country_code"
geoip2
log_format main '$remote_addr - $remote_user [$time_local] "$request" '
                '$status $body_bytes_sent "$http_referer" '
                '"$http_user_agent" "$http_x_forwarded_for" '
                'country=$geoip2_data_country_code city="$geoip2_data_city_name"';

access_log /var/log/nginx/access.log main;
配置步骤
第一步:下载GeoIP的数据库文件
tar zxf GeoLite2-Country_20240524.tar.gz -C /opt/
tar zxf GeoLite2-City_20240524.tar.gz -C /opt/
第二步:编译安装libmaxminddb依赖
yum install gcc -y
wget https://github.com/maxmind/libmaxminddb/releases/download/1.9.1/libmaxminddb-1.9.1.tar.gz
tar zxf libmaxminddb-1.9.1.tar.gz
cd libmaxminddb
./configure
make
make check
make install
echo /usr/local/lib  >> /etc/ld.so.conf.d/local.conf
ldconfig
第三步:编译ngx_http_geoip2_module模块
下载ngx_http_geoip2_module模块
wget https://codeload.github.com/leev/ngx_http_geoip2_module/tar.gz/refs/tags/3.4
tar zxf ngx_http_geoip2_module-3.4.tar.gz -C /opt/
ls -l /opt/ngx_http_geoip2_module-3.4
下载Nginx源码
yum install openssl-devel pcre-devel -y
groupadd -g 1000 www
useradd -u 1000 -g 1000 -M -s /sbin/nologin www
wget https://nginx.org/download/nginx-1.26.0.tar.gz
tar zxf nginx-1.26.0.tar.gz
cd nginx-1.26.0
动态编译方法(二选一)
进入nginx源码目录
cd nginx-1.26.0
./configure --with-compat --add-dynamic-module=/opt/ngx_http_geoip2_module-3.4
make modules
ls -l objs/ngx_http_geoip2_module.so
可以将编译后的文件复制到其他目录
mkdir /opt/ngx_module
cp objs/ngx_http_geoip2_module.so /opt/ngx_module/
ls -l /opt/ngx_module/
在Nginx主配置文件里添加动态加载模块
load_module /opt/ngx_module/ngx_http_geoip2_module.so;
静态编译方法(二选一)
静态编译模块
cd nginx-1.26.0
./configure --user=www --group=www --prefix=/opt/nginx-1.26.0 --with-http_stub_status_module --with-http_ssl_module --with-pcre --add-module=/opt/ngx_http_geoip2_module-3.4
make
make install
编译完成后需要替换掉原来的nginx文件
cp objs/nginx /opt/nginx-1.26.0/sbin/nginx
检查新命令是否加入了模块
[root@web-7 /mnt/nginx-1.26.0]# /opt/nginx-1.26.0/sbin/nginx -V
nginx version: nginx/1.26.0
built by gcc 4.8.5 20150623 (Red Hat 4.8.5-44) (GCC)
built with OpenSSL 1.0.2k-fips  26 Jan 2017
TLS SNI support enabled
configure arguments: --user=www --group=www --prefix=/opt/nginx-1.26.0 --with-http_stub_status_module --with-http_ssl_module --with-pcre --add-module=/opt/ngx_http_geoip2_module-3.4
第四步:修改Nginx配置添加GeoIP解析字段
[root@VM-12-17-centos nginx-1.26.0]# cat /opt/nginx-1.26.0/conf/nginx.conf
user  www;
worker_processes  1;

events {
    worker_connections  1024;
}

http {
    include       mime.types;
    default_type  application/octet-stream;

    log_format  main  '$remote_addr - $remote_user [$time_local] "$request" '
                      '$status $body_bytes_sent "$http_referer" '
                      '"$http_user_agent" "$http_x_forwarded_for" '
                      'country=$geoip2_data_country_code city="$geoip2_data_city_name"';

    access_log  logs/access.log  main;

    sendfile        on;
    #tcp_nopush     on;

    keepalive_timeout  65;

    gzip  on;

    geoip2 /opt/GeoLite2-Country_20240524/GeoLite2-Country.mmdb {
        auto_reload 5m;
        $geoip2_metadata_country_build metadata build_epoch;
        $geoip2_data_country_code default=US source=$remote_addr country iso_code;
        $geoip2_data_country_name country names en;
    }

    geoip2 /opt/GeoLite2-City_20240524/GeoLite2-City.mmdb {
        $geoip2_data_city_name default=London city names en;
    }

    server {
        listen       8080;
        server_name  localhost;

        location / {
            root   html;
            index  index.html index.htm;
        }
    }
}
第七步:访问并测试
74.122.101.12 - - [26/May/2024:18:08:05 +0800] "GET / HTTP/1.1" 304 0 "-" "Mozilla/5.0 (Windows NT 10.0; Win64; x64) AppleWebKit/537.36 (KHTML, like Gecko) Chrome/125.0.0.0 Safari/537.36" "-" country=TR city="Istanbul"

211.72.89.21 - - [26/May/2024:18:08:31 +0800] "GET / HTTP/1.1" 304 0 "-" "Mozilla/5.0 (Windows NT 10.0; Win64; x64) AppleWebKit/537.36 (KHTML, like Gecko) Chrome/125.0.0.0 Safari/537.36" "-" country=TW city="Kaohsiung City"
第x章 HTTP反向代理模块-七层
官方文档
配置语法
配置实验
第x章 HTTP反向代理模块-四层
官方文档
配置语法
配置实验
第x章 HTTP负载均衡模块
官方文档
配置语法
配置实验
第x章 HTTP SSL模块
官方文档
配置语法
配置实验
更新: 2024-11-19 08:51:27