第1章 综合架构开场
第1章 学习方法的变化
1.第一阶段学习方法
记命令 80-150
记参数 常用 3-5个
练习 考试题手写
回顾 总结
2.第二阶段学习方法
理解 思考 提问
应用场景 干嘛用的 怎么用
安装部署 配置文件 启动 测试 关闭
各种报错 看日志 看日志 看日志 收集 整理
英文单词量积累 不然看不懂报错
第2章 综合架构开场介绍
1.中小规模网站架构组成
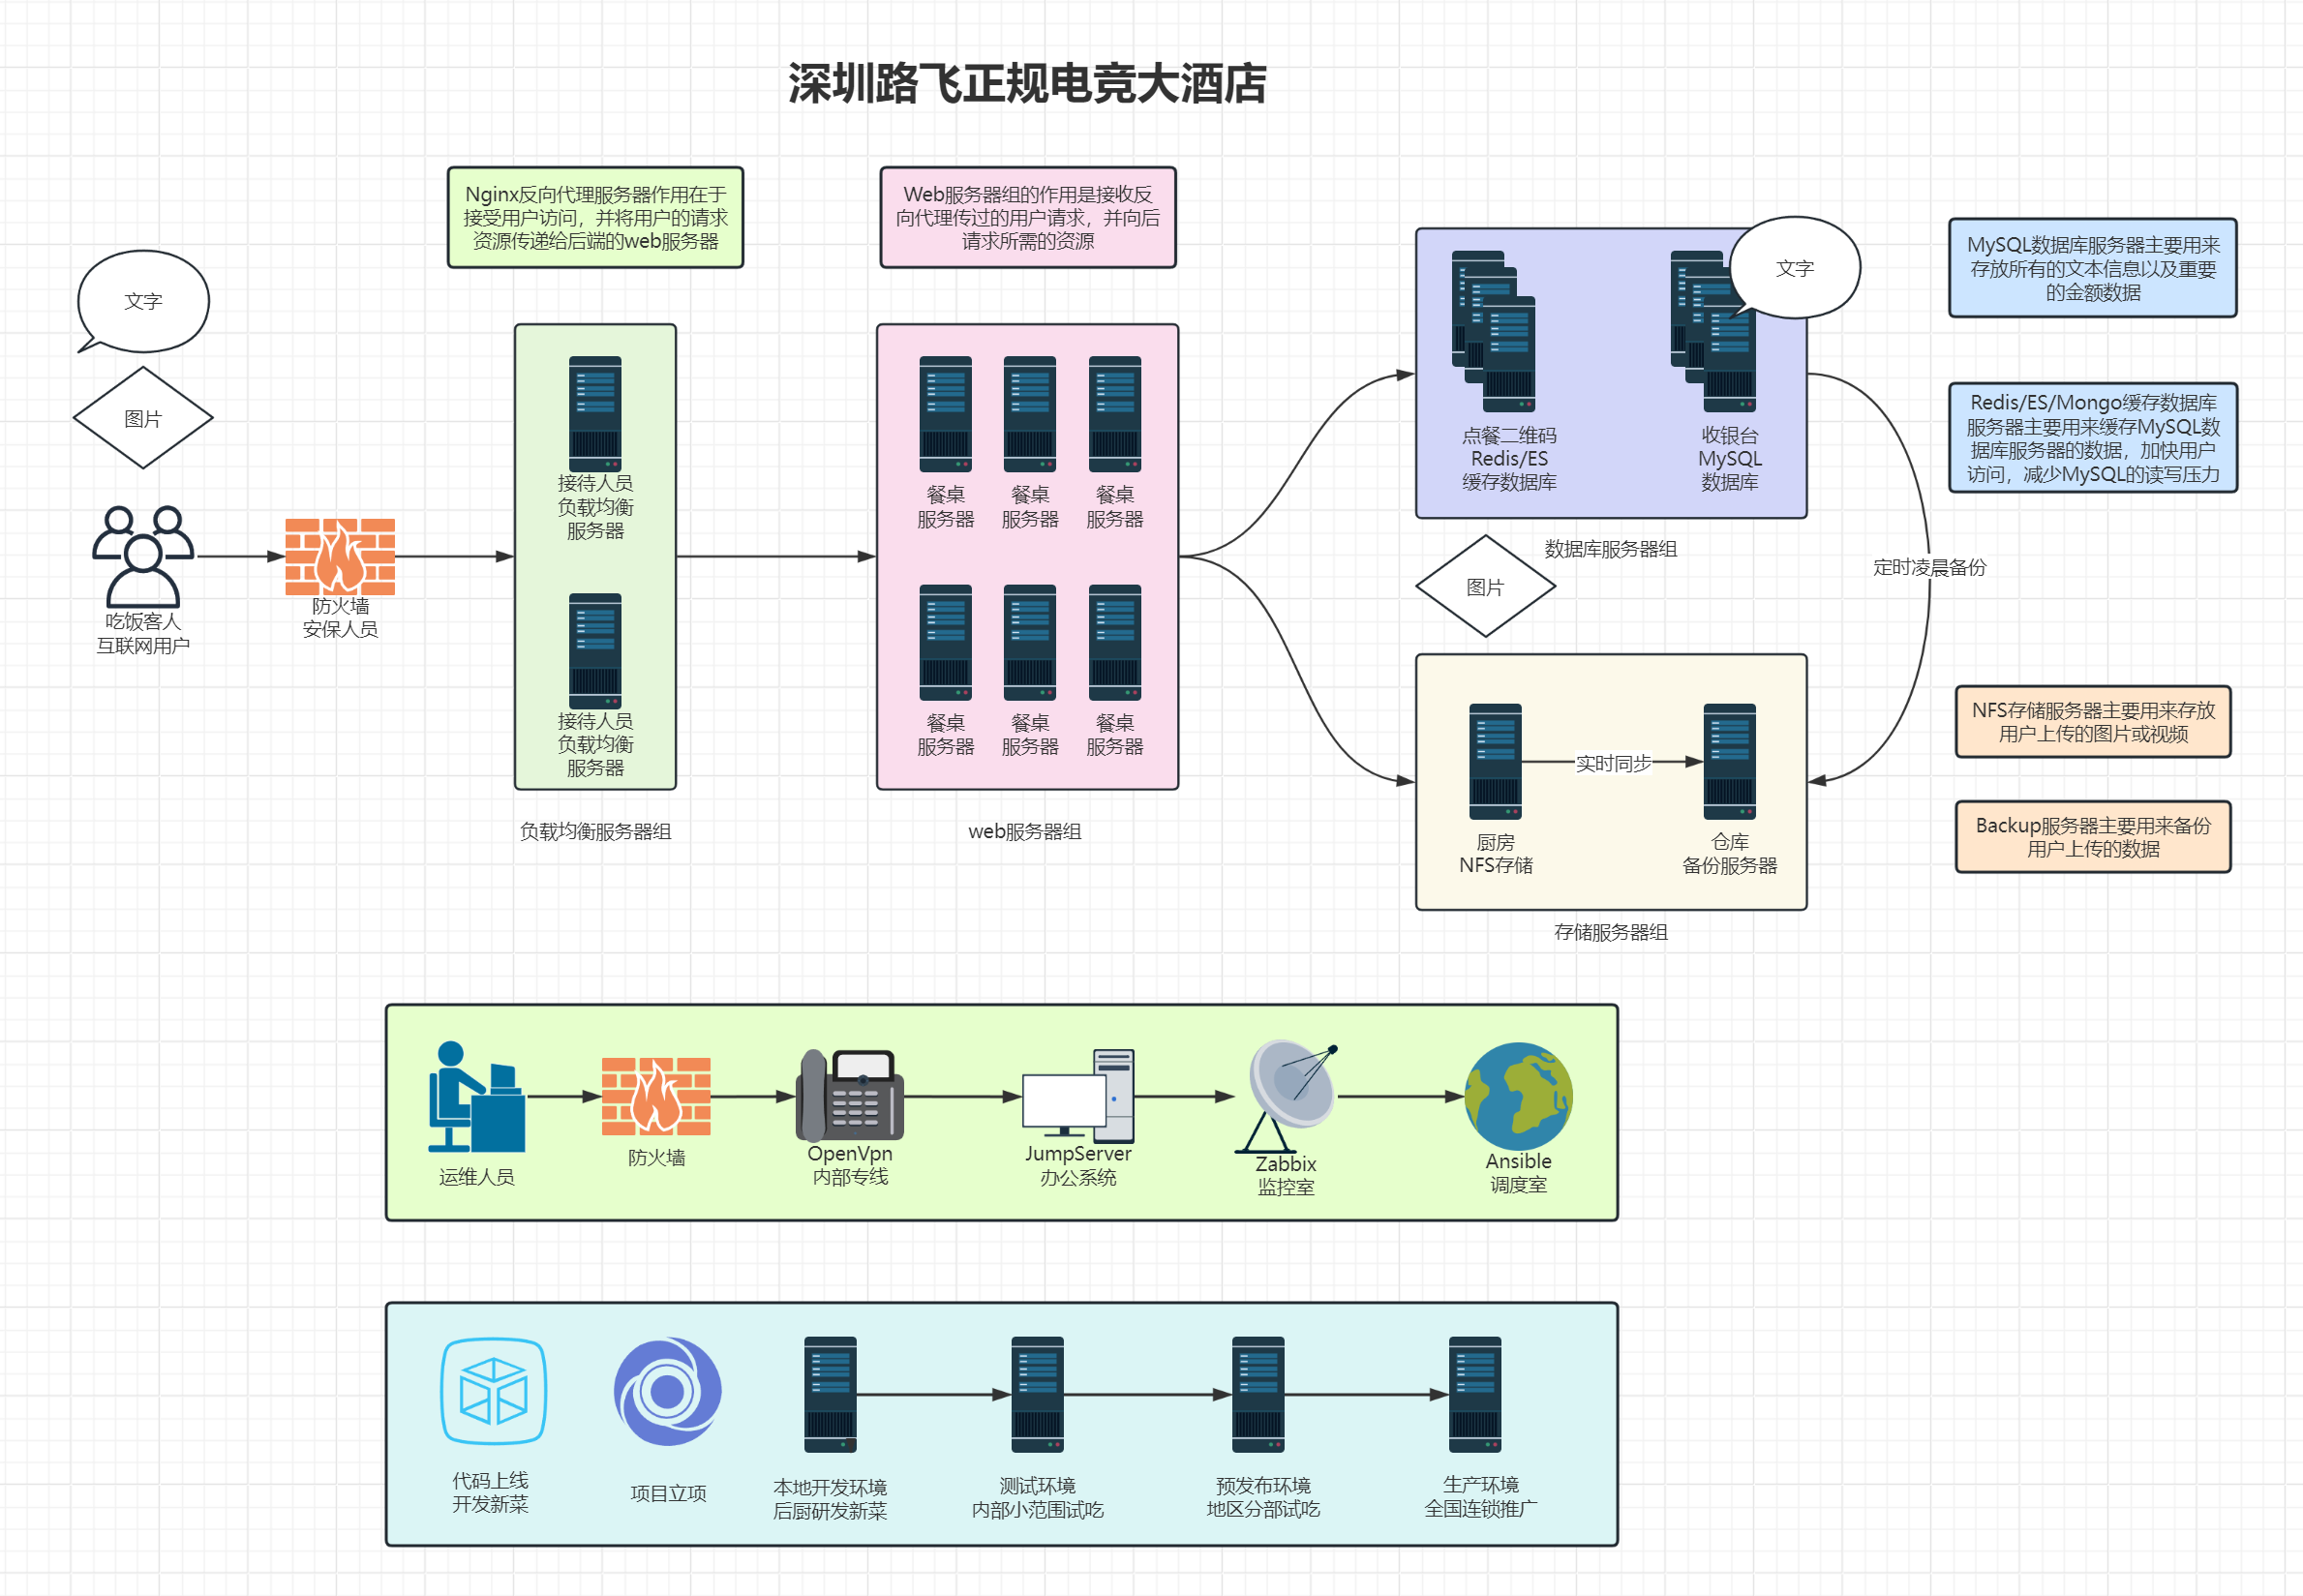
1) 顾客--用户

    访问网站的人员


 2) 保安--防火墙 (iptables)

    进行访问策略控制


 3) 迎宾服务员--负载均衡服务器  (nginx)

    对用户的访问请求进行调度处理


 4) 点餐服务员---web服务器    (nginx)

    处理用户的请求


 5) 结账前台---数据库服务器   (mysql)

    存储的字符数据


 6) 厨师---存储服务器     (nfs)

    存储图片 音频 视频 附件等数据信息


 7) 食材仓库---备份服务器    (rsync+crond-定时备份 rsync+lsyncd--实时备份)

    存储网站所有服务器的重要数据


 8) 自助点菜系统---缓存服务器     (redis elasticsearch mongodb)

    a 将数据信息存储到内存中

    b 减缓服务器的压力


 9) 调度总台---批量管理服务器 (ansible)

    批量管理多台服务器主机
2.主机名称和IP地址规划
服务器作用      主机名            外网地址      内网地址         运行软件
管理服务器      m-61             10.0.0.61    172.16.1.61    Ansible/zabbix/jumpserver/openvpn
反向代理服务器  lb-5             10.0.0.5     172.16.1.5      nginx/keepalived
反向代理服务器  lb-6             10.0.0.6     172.16.1.6      nginx/keepalived
web服务器      web-7             10.0.0.7    172.16.1.7      nginx/tomcat
web服务器      web-8             10.0.0.8    172.16.1.8      nginx/tomcat
存储服务器     nfs-31            10.0.0.31    172.16.1.31    nfs/rsyncd/lsyncd
备份服务器     backup-41         10.0.0.41    172.16.1.41    nfs/rsyncd/lsyncd
数据库服务器   db-51             10.0.0.51    172.16.1.51    mysql/redis
第3章 综合架构环境准备
1.创建一台全新虚拟机作为模版
 系统  CentOS7
 内存  建议2G
 网卡
 eth0: NAT模式 模拟外网 10.0.0.x
 eth1: LAN区段 模拟内网 172.16.1.x
 硬盘  40G
2.精简网卡信息
cat > /etc/sysconfig/network-scripts/ifcfg-eth0 << EOF
TYPE=Ethernet
BOOTPROTO=none
NAME=eth0
DEVICE=eth0
ONBOOT=yes
IPADDR=10.0.0.100
PREFIX=24
GATEWAY=10.0.0.254
DNS1=10.0.0.254
EOF

cat > /etc/sysconfig/network-scripts/ifcfg-eth1 << EOF
TYPE=Ethernet
ONBOOT=yes
BOOTPROTO=none
IPADDR=172.16.1.100
PREFIX=24
NAME=eth1
DEVICE=eth1
EOF

systemctl restart network
ip a
2.关闭防火墙/selinux/firewalld/NetworkManager
systemctl stop firewalld NetworkManager
systemctl disable firewalld NetworkManager
systemctl is-active firewalld NetworkManager
systemctl is-enabled firewalld NetworkManager
sed -i '/SELINUX=/c SELINUX=disabled' /etc/selinux/config
setenforce 0
getenforce
iptables -nL
3.优化SSH连接速度慢
sed -i '/#UseDNS yes/c UseDNS no' /etc/ssh/sshd_config
sed -i '/GSSAPIAuthentication/c GSSAPIAuthentication no' /etc/ssh/sshd_config
egrep -n '^(GSSAPIA|UseDNS)' /etc/ssh/sshd_config
systemctl restart sshd
4.优化命令行显示
# 备份

cp /etc/profile /mnt/


# 编辑并写入

vim /etc/profile
export PS1="[\[\e[34;1m\]\u@\[\e[0m\]\[\e[32;1m\]\H\[\e[0m\] \[\e[31;1m\]\w\[\e[0m\]]\\$ "


# 立刻生效

source /etc/profile
5.配置yum源
mv /etc/yum.repos.d/* /tmp/
curl -o /etc/yum.repos.d/CentOS-Base.repo http://mirrors.aliyun.com/repo/Centos-7.repo
curl -o /etc/yum.repos.d/epel.repo http://mirrors.aliyun.com/repo/epel-7.repo
sed -i '/aliyuncs/d' /etc/yum.repos.d/CentOS-Base.repo
yum makecache fast
6.安装常用软件
yum install -y tree vim wget bash-completion bash-completion-extras lrzsz net-tools sysstat iotop iftop htop unzip telnet ntpdate
7.关闭邮件警告
echo 'unset mailcheck' >> /etc/profile
source /etc/profile
8.定时任务配置时间同步
crontab -e
*/5 * * * * /usr/sbin/ntpdate time1.aliyun.com > /dev/null 2>&1
9.配置hosts解析
cat > /etc/hosts << 'EOF'
10.0.0.5 172.16.1.5 lb-5
10.0.0.6 172.16.1.6 lb-6
10.0.0.7 172.16.1.7 web-7
10.0.0.8 172.16.1.8 web-8
10.0.0.31 172.16.1.31 nfs-31
10.0.0.41 172.16.1.41 backup-41
10.0.0.51 172.16.1.51 db-51
10.0.0.61 172.16.1.61 m-61
EOF
第4章 克隆虚拟机
1.从模板机链接克隆
2.修改IP地址
sed -i 's#100#41#g' /etc/sysconfig/network-scripts/ifcfg-eth*
systemctl restart network
3.修改主机名
hostnamectl set-hostname backup-41
4.关机做快照
更新: 2024-11-11 15:13:29